
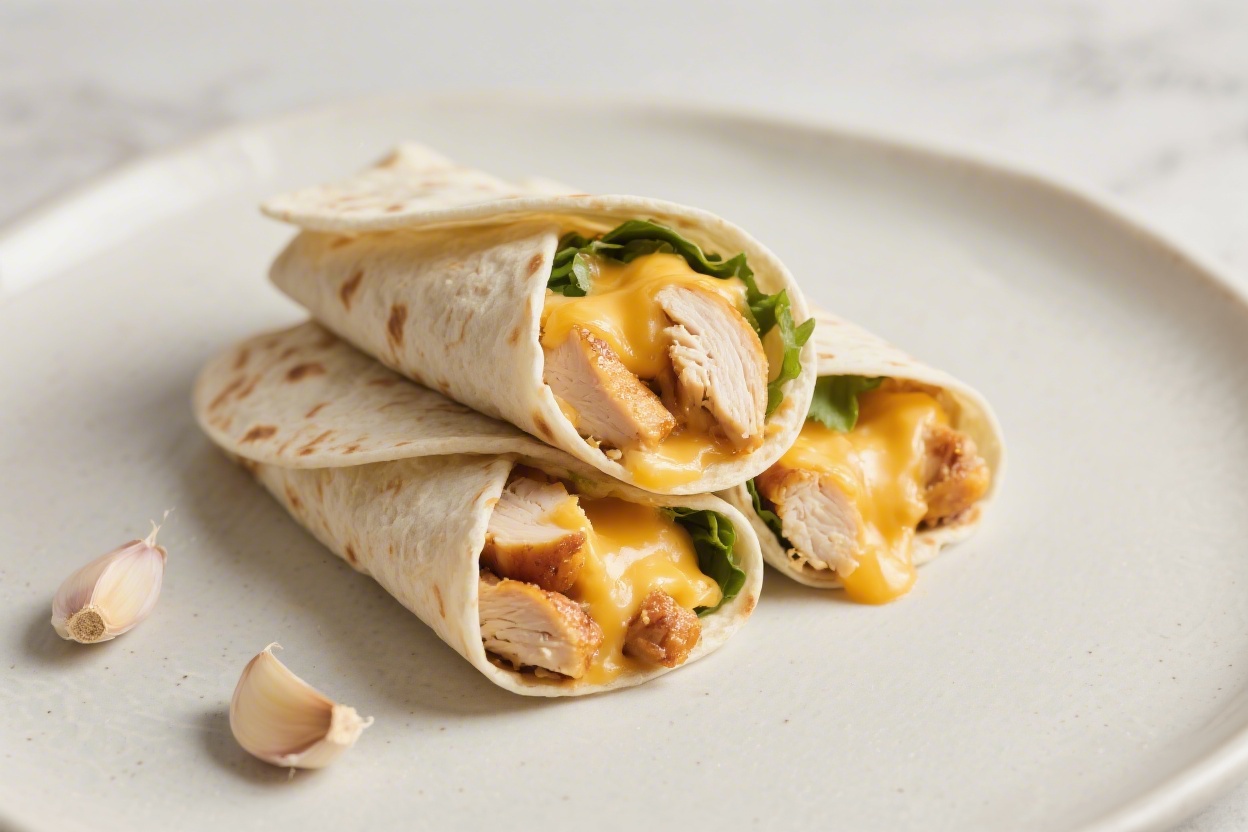
If you love bold garlic, melty cheese, and juicy chicken all tucked into a warm tortilla, this wrap is going to be a new favorite. It’s the kind of meal that feels comforting but still fresh, and you can make it on a busy weeknight without stress. Everything happens in one pan, and you can customize it with whatever you have in the fridge.
The garlic butter sauce is the star—it coats the chicken and seeps into the cheese for an ultra-satisfying bite. Serve it hot for lunch, dinner, or even as a game-day snack.

Cheesy Garlic Chicken Wraps - Easy, Cozy, and Packed With Flavor
Ingredients
- Chicken: 1 lb boneless, skinless chicken breasts or thighs, thinly sliced
- Tortillas: 4 large flour tortillas (10-inch burrito size works best)
- Cheese: 1 1/2 cups shredded mozzarella; 1/2 cup shredded sharp cheddar
- Garlic: 4–5 cloves, minced
- Butter: 3 tablespoons (salted or unsalted)
- Olive oil: 1 tablespoon
- Chicken broth or water: 1/4 cup
- Seasonings: 1 teaspoon kosher salt, 1/2 teaspoon black pepper, 1 teaspoon smoked paprika, 1/2 teaspoon onion powder, 1/2 teaspoon dried oregano
- Lemon juice: 1 tablespoon (fresh if possible)
- Fresh parsley: 2 tablespoons, chopped (optional but recommended)
- Optional add-ins: sliced red onion, baby spinach or shredded romaine, tomato slices, pickled jalapeños, ranch or garlic mayo
Instructions
- Prep the chicken: Pat chicken dry and slice into thin strips. Toss with salt, pepper, smoked paprika, onion powder, and oregano. Set aside while you prep the garlic.
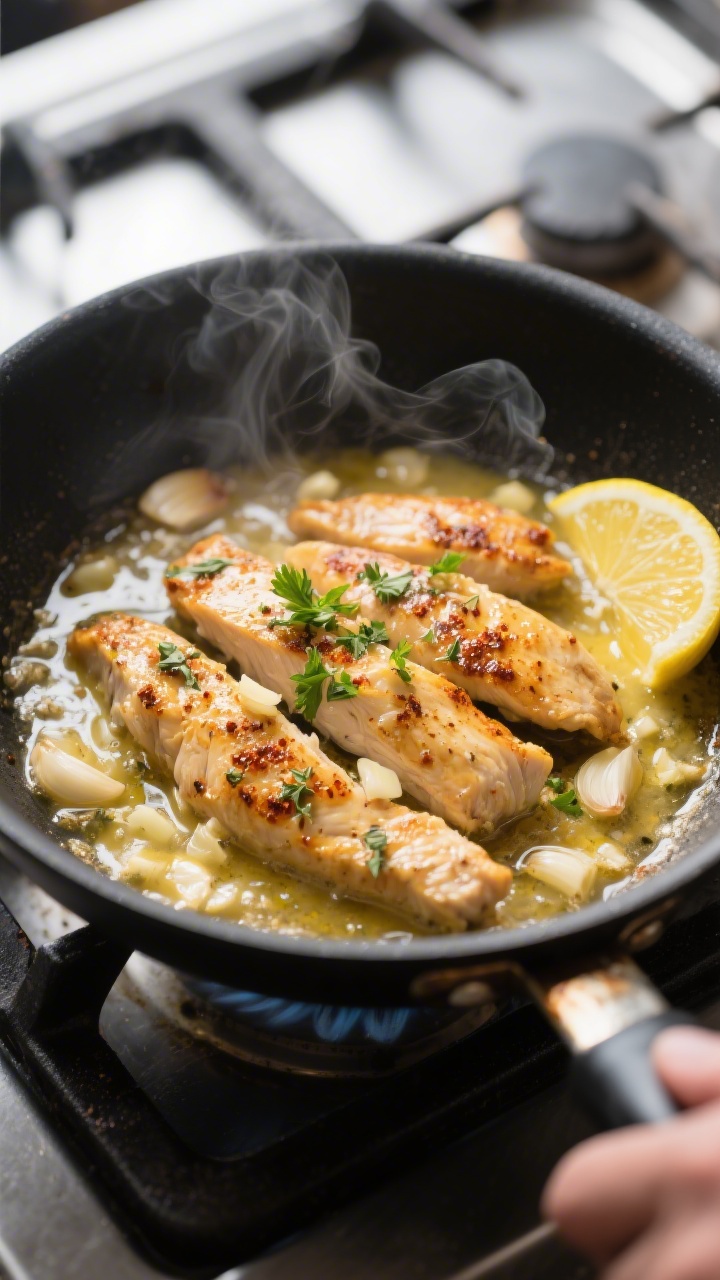
- Make the garlic base: Warm a large skillet over medium heat. Add olive oil and 1 tablespoon of butter. Once melted, add minced garlic. Cook 30–60 seconds until fragrant. Keep the heat moderate so it doesn’t burn.
- Sear the chicken: Add the seasoned chicken to the skillet in an even layer. Let it sear undisturbed for 2–3 minutes, then stir. Cook 5–7 minutes total, until golden and cooked through.
- Build the sauce: Add the remaining 2 tablespoons of butter and the broth. Stir and simmer 1–2 minutes to create a glossy garlic-butter sauce. Finish with lemon juice and chopped parsley. Taste and adjust salt and pepper.
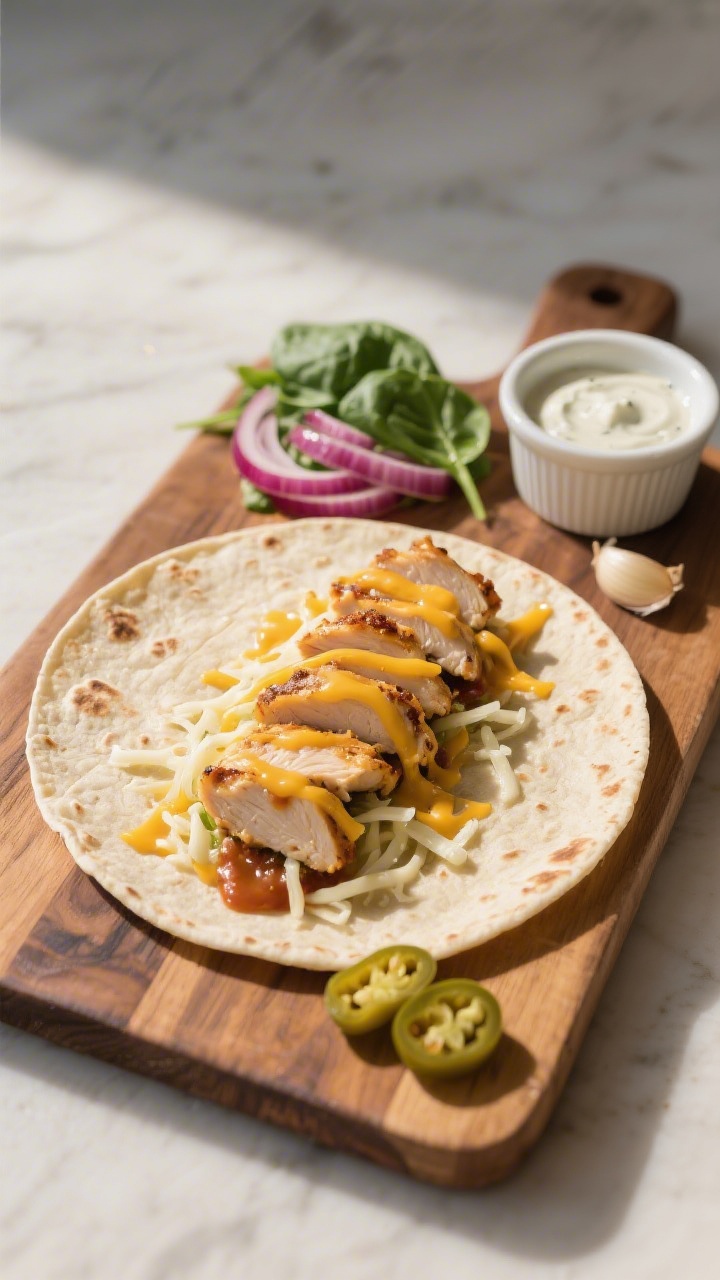
- Warm the tortillas: Heat a clean skillet over medium-low. Warm each tortilla for 15–20 seconds per side so they’re pliable.
- Assemble: Lay a warm tortilla on a board. Add a handful of mozzarella and a sprinkle of cheddar down the center. Spoon a generous line of garlicky chicken on top, letting some sauce soak into the cheese. Add optional veg or a drizzle of ranch if using.
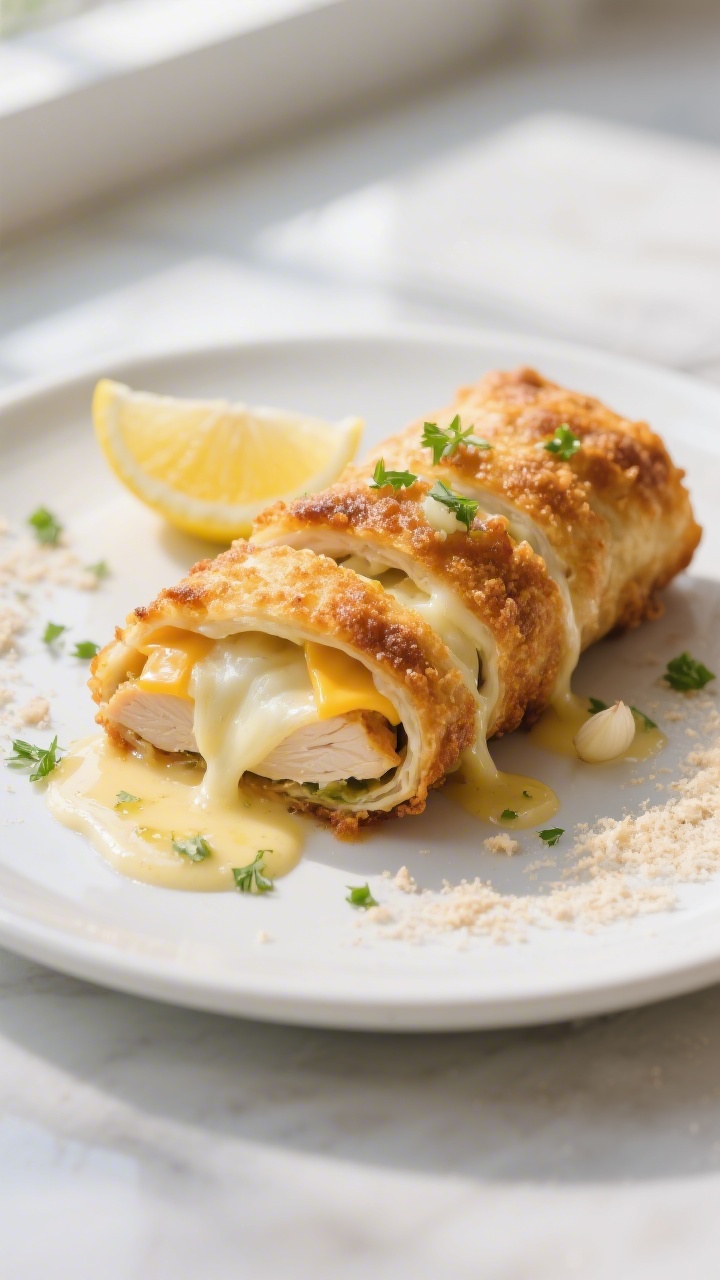
- Wrap it up: Fold the sides in, then roll tightly from the bottom up to form a secure wrap.
- Crisp the wrap: Place the seam-side down in a lightly oiled skillet over medium heat. Cook 1–2 minutes per side until the tortilla is golden and the cheese is melted. Press gently with a spatula for even browning.
- Serve: Slice in half and serve hot. Spoon any extra garlic-butter sauce over the cut sides or use it for dipping.
Why This Recipe Works
- Bold garlic flavor: Fresh garlic cooked gently in butter gives a deep, savory base that doesn’t taste harsh.
- Juicy chicken: A quick sear locks in moisture, and a splash of broth keeps the meat tender.
- Melty, stretchy cheese: A blend of mozzarella and cheddar gives both pull and sharpness.
- Balanced texture: Crisped tortillas, soft chicken, gooey cheese, and a little crunch from lettuce or onions hit every note.
- Fast and flexible: Works with leftovers, rotisserie chicken, or even pre-cooked strips if you’re short on time.
What You’ll Need
- Chicken: 1 lb boneless, skinless chicken breasts or thighs, thinly sliced
- Tortillas: 4 large flour tortillas (10-inch burrito size works best)
- Cheese: 1 1/2 cups shredded mozzarella; 1/2 cup shredded sharp cheddar
- Garlic: 4–5 cloves, minced
- Butter: 3 tablespoons (salted or unsalted)
- Olive oil: 1 tablespoon
- Chicken broth or water: 1/4 cup
- Seasonings: 1 teaspoon kosher salt, 1/2 teaspoon black pepper, 1 teaspoon smoked paprika, 1/2 teaspoon onion powder, 1/2 teaspoon dried oregano
- Lemon juice: 1 tablespoon (fresh if possible)
- Fresh parsley: 2 tablespoons, chopped (optional but recommended)
- Optional add-ins: sliced red onion, baby spinach or shredded romaine, tomato slices, pickled jalapeños, ranch or garlic mayo
Step-by-Step Instructions
- Prep the chicken: Pat chicken dry and slice into thin strips. Toss with salt, pepper, smoked paprika, onion powder, and oregano.
Set aside while you prep the garlic.
- Make the garlic base: Warm a large skillet over medium heat. Add olive oil and 1 tablespoon of butter. Once melted, add minced garlic.
Cook 30–60 seconds until fragrant. Keep the heat moderate so it doesn’t burn.
- Sear the chicken: Add the seasoned chicken to the skillet in an even layer. Let it sear undisturbed for 2–3 minutes, then stir.
Cook 5–7 minutes total, until golden and cooked through.
- Build the sauce: Add the remaining 2 tablespoons of butter and the broth. Stir and simmer 1–2 minutes to create a glossy garlic-butter sauce. Finish with lemon juice and chopped parsley.
Taste and adjust salt and pepper.
- Warm the tortillas: Heat a clean skillet over medium-low. Warm each tortilla for 15–20 seconds per side so they’re pliable.
- Assemble: Lay a warm tortilla on a board. Add a handful of mozzarella and a sprinkle of cheddar down the center.
Spoon a generous line of garlicky chicken on top, letting some sauce soak into the cheese. Add optional veg or a drizzle of ranch if using.
- Wrap it up: Fold the sides in, then roll tightly from the bottom up to form a secure wrap.
- Crisp the wrap: Place the seam-side down in a lightly oiled skillet over medium heat. Cook 1–2 minutes per side until the tortilla is golden and the cheese is melted.
Press gently with a spatula for even browning.
- Serve: Slice in half and serve hot. Spoon any extra garlic-butter sauce over the cut sides or use it for dipping.
Storage Instructions
- Cooked chicken: Store the chicken and sauce in an airtight container in the fridge for up to 4 days.
- Assembled wraps: Best eaten fresh. If needed, cool completely, wrap tightly in foil, and refrigerate up to 24 hours.
Re-crisp in a skillet over low heat or air fryer at 350°F (175°C) for 4–6 minutes.
- Freezing: Freeze the cooked chicken (without veggies or sauces) up to 2 months. Thaw overnight, reheat gently, then assemble and crisp.
- Reheating tip: Add a teaspoon of water to the skillet and cover for the first minute to steam, then uncover to re-crisp.
Health Benefits
- Lean protein: Chicken provides essential amino acids that help with muscle repair and steady energy.
- Garlic perks: Garlic contains compounds like allicin, which are linked to heart health and immune support.
- Balanced fats: Butter and olive oil add flavor and satiety; using a moderate amount keeps it satisfying without being heavy.
- Customizable nutrition: Add spinach, lettuce, tomatoes, or onions for fiber, vitamin C, and antioxidants.
- Portion control: Large wraps are filling; half a wrap plus a side salad makes a lighter meal.
What Not to Do
- Don’t burn the garlic: Bitter garlic can ruin the sauce. Keep heat at medium and watch closely.
- Don’t overcook the chicken: Thin cuts cook fast.
Pull them as soon as they’re opaque and juicy.
- Don’t overfill the wrap: Too much filling leads to tears and leaks. Keep a compact layer and roll tightly.
- Don’t skip warming the tortillas: Cold tortillas crack. A quick warm makes rolling easy.
- Don’t add watery veggies: Pat tomatoes or greens dry so the wrap stays crisp, not soggy.
Recipe Variations
- Spicy kick: Add red pepper flakes to the garlic butter or toss the chicken with cayenne.
Finish with pickled jalapeños.
- Creamy garlic ranch: Mix 2 tablespoons ranch with 1 minced garlic clove and a squeeze of lemon; drizzle inside before rolling.
- Bacon and scallion: Add crisp bacon bits and sliced green onions with the cheese for smoky crunch.
- Herb-forward: Swap oregano for Italian seasoning and add fresh basil or dill at the end.
- Loaded veggie: Sauté mushrooms and bell peppers with the chicken. Add spinach just to wilt.
- Low-carb option: Use low-carb tortillas or wrap in large lettuce leaves. Go lighter on the butter and cheese if preferred.
- Dairy-free: Use a plant-based butter and a dairy-free mozzarella-style shred; still crisp the wrap for texture.
- Rotisserie shortcut: Shred store-bought rotisserie chicken, warm in the garlic-butter sauce with a splash of broth, then assemble.
FAQ
Can I use chicken thighs instead of breasts?
Yes.
Thighs stay extra juicy and are more forgiving. Just slice thin so they cook quickly and absorb the garlic-butter sauce.
What cheese melts best for these wraps?
Mozzarella gives great stretch, while cheddar adds flavor. A 3:1 mix is ideal.
Monterey Jack or provolone also work well.
How do I keep the wrap from getting soggy?
Crisp the assembled wrap in a skillet so the tortilla forms a barrier. Pat any veggies dry and avoid adding too much sauce inside.
Can I bake these instead of pan-crisping?
You can. Place seam-side down on a sheet pan, brush lightly with oil, and bake at 400°F (200°C) for 8–10 minutes, flipping once.
The skillet gives a better crust, but the oven is easy for batches.
What goes well on the side?
A simple salad, garlic roasted potatoes, or a cup of tomato soup pairs nicely. For something fresh, try cucumber slices with lemon and salt.
Is there a way to make it less garlicky?
Reduce to 2–3 cloves and cook them gently until soft and sweet. You can also use roasted garlic for a milder, caramelized flavor.
Can I make these ahead for lunches?
Assemble without wet ingredients (no tomatoes or sauces), wrap tightly, and chill.
Re-crisp in a skillet or air fryer before eating. Pack fresh greens on the side and add them after reheating.
Final Thoughts
Cheesy Garlic Chicken Wraps bring together simple ingredients and big flavor with very little fuss. The garlic-butter sauce, melty cheese, and tender chicken create a wrap that feels special but cooks fast.
Keep the basics the same, then play with add-ins to match your mood. Whether you’re feeding a crowd or just yourself, this is a go-to recipe you’ll come back to again and again.
Printable Recipe Card
Want just the essential recipe details without scrolling through the article? Get our printable recipe card with just the ingredients and instructions.