
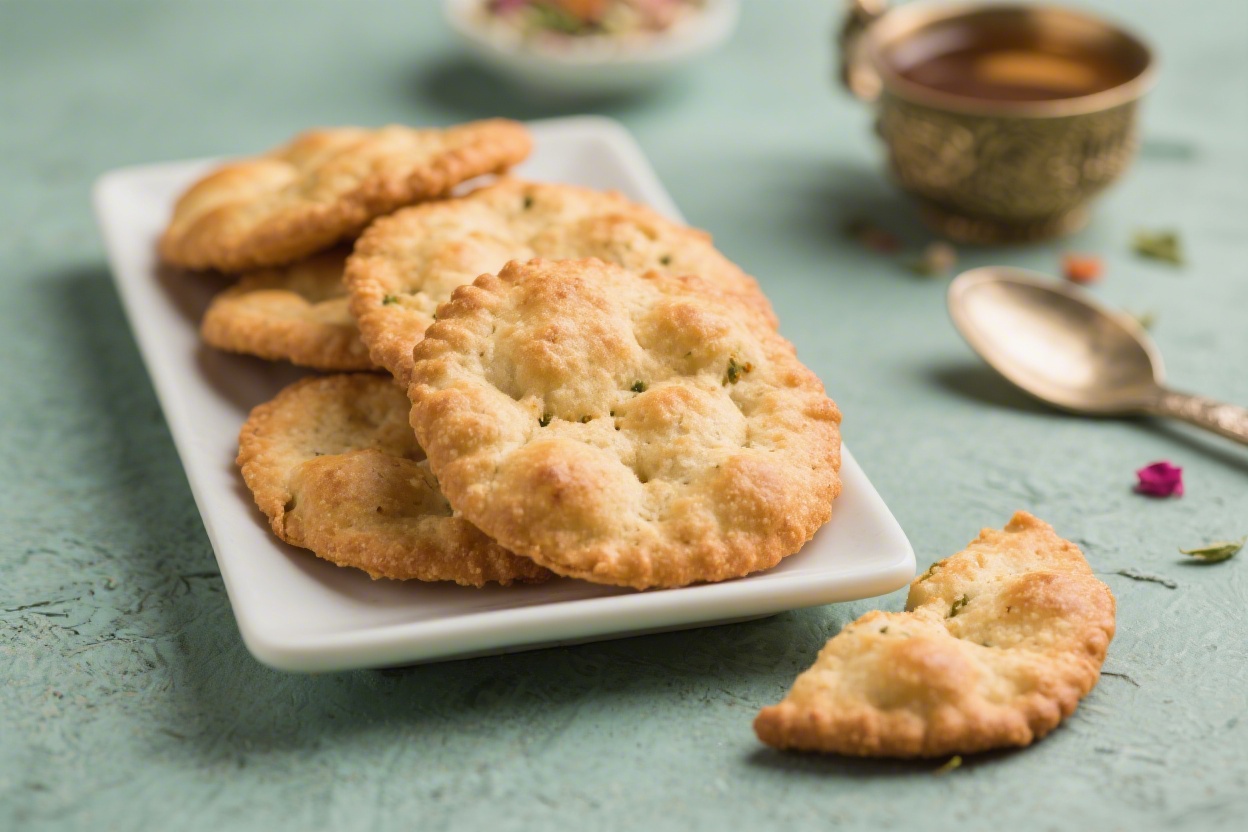
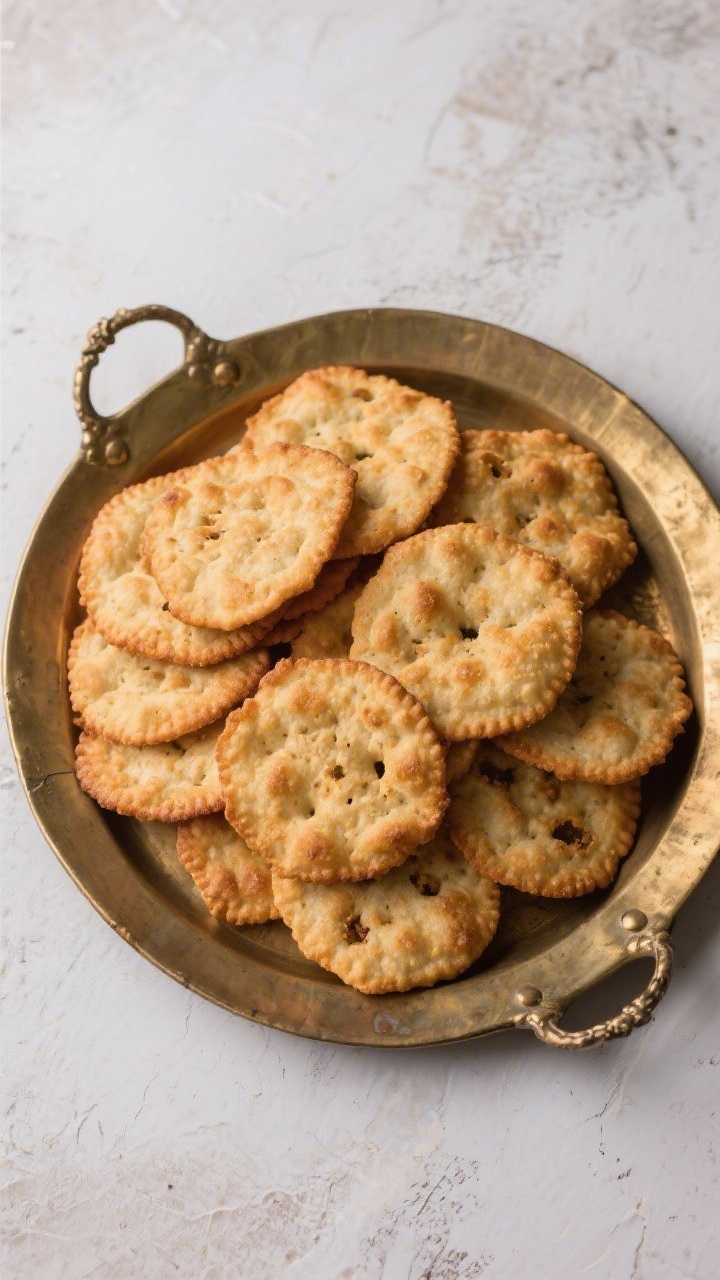
Mathri is that quiet hero of tea time—golden, flaky, and satisfyingly crisp with just the right hint of spice. It’s the kind of snack you reach for without thinking, then suddenly realize you’ve had three. This North Indian classic is easy to make at home and tastes miles better than the store-bought pack.
With a few tricks for the dough and frying, you’ll get perfect layers and crunch every time. Whether you serve it with chai, pickle, or a light dip, mathri never disappoints.

Crispy Mathri (Flaky Tea-Time Snack) - A Simple, Flavorful Classic
Ingredients
- 2 cups all-purpose flour (maida)
- 2 tablespoons semolina (sooji/rava) for extra crunch
- 4 tablespoons neutral oil or ghee (for shortening/moyen)
- 3/4 to 1 teaspoon salt, to taste
- 1 teaspoon carom seeds (ajwain), lightly crushed
- 1/2 teaspoon crushed black pepper (optional, for a mild kick)
- 1/2 teaspoon kasuri methi (dried fenugreek), crushed (optional)
- Approx. 1/3 to 1/2 cup water, cold or room temperature, as needed
- Oil for deep frying (neutral oil like sunflower, canola, or peanut)
Instructions
- Mix the dry ingredients: In a large bowl, combine flour, semolina, salt, carom seeds, black pepper, and kasuri methi if using. Stir to distribute the spices evenly.
- Rub in the fat: Add 4 tablespoons of oil or ghee to the flour. Use your fingertips to rub it into the flour until it resembles coarse breadcrumbs. This step is key—the mixture should clump when pressed and then fall apart. It’s what creates the flaky layers.
- Add water gradually: Sprinkle water a little at a time and bring the dough together. You’re aiming for a stiff, tight dough, not soft. It should feel firmer than roti dough. Don’t over-knead; 1–2 minutes of gentle kneading is enough.
- Rest the dough: Cover the dough with a damp cloth and let it rest for 20–25 minutes. This relaxes the gluten and helps the mathri puff slightly and cook evenly.
- Shape the mathri: Divide the dough into small lemon-sized balls. For classic shapes, flatten each ball into a disc about 2–2.5 inches wide and 1/4 inch thick. You can also roll the dough and cut rounds with a cookie cutter. Prick each disc 3–4 times with a fork to prevent puffing.
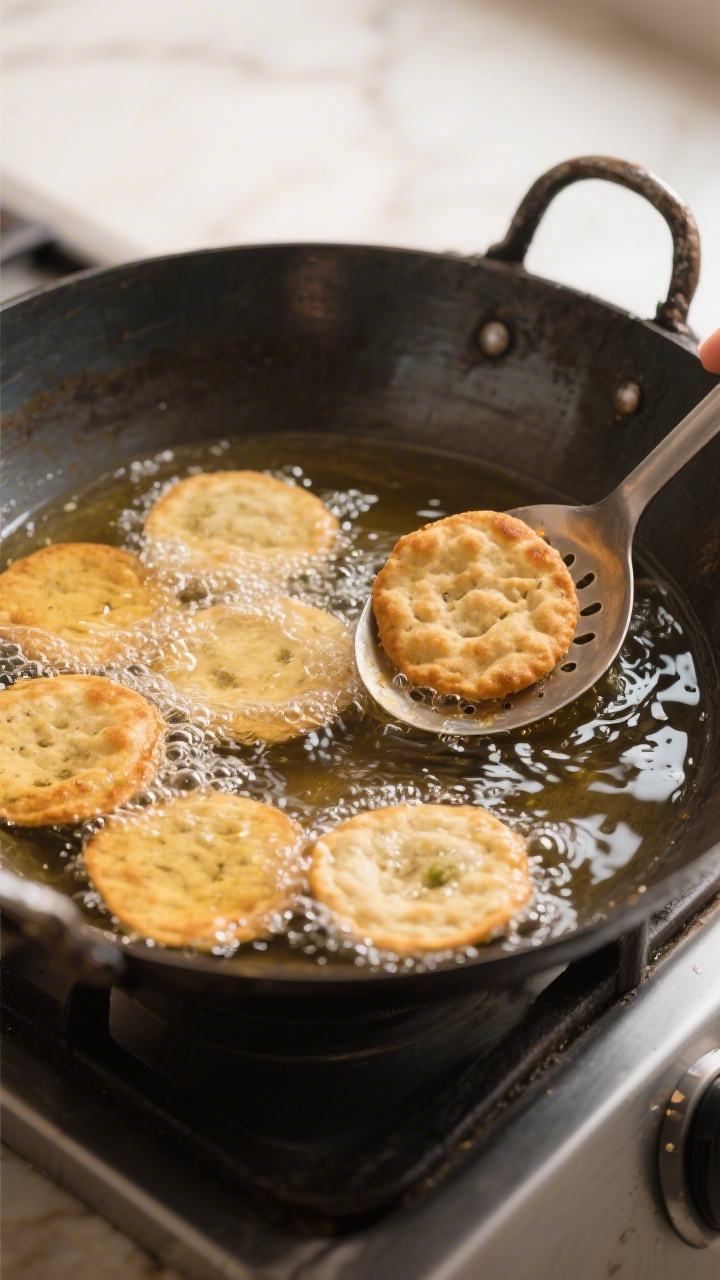
- Heat the oil: In a deep, wide pan, heat oil on medium-low. To test, drop a tiny piece of dough—if it rises slowly with gentle bubbles, the oil is ready. If it sizzles hard and browns fast, it’s too hot.
- Fry low and slow: Slide in a few discs without crowding. Fry on low to medium-low heat, turning occasionally. This slow fry ensures even cooking and a crisp, layered texture. Each batch should take 6–10 minutes, depending on thickness.
- Drain and cool: Once golden and crisp, remove the mathris to a wire rack or paper towels. Let them cool completely—they’ll firm up further as they cool.
- Taste and adjust: Try one after cooling. If needed, sprinkle a pinch of salt while they’re still slightly warm, or note adjustments for your next batch.
What Makes This Recipe So Good
- Perfectly flaky texture: The right fat-to-flour ratio and gentle handling build layers that stay crisp for days.
- Simple pantry ingredients: Flour, oil, and basic spices are all you need—no fancy tools or special skills required.
- Customizable flavor: Keep it plain and salty or add carom seeds, black pepper, or kasuri methi for a bold, savory bite.
- Great for make-ahead: Mathri stores well and keeps its crunch, making it ideal for festivals, guests, or busy weeks.
- Budget-friendly and reliable: Minimal ingredients, consistent results, and always a hit with kids and adults.
Ingredients
- 2 cups all-purpose flour (maida)
- 2 tablespoons semolina (sooji/rava) for extra crunch
- 4 tablespoons neutral oil or ghee (for shortening/moyen)
- 3/4 to 1 teaspoon salt, to taste
- 1 teaspoon carom seeds (ajwain), lightly crushed
- 1/2 teaspoon crushed black pepper (optional, for a mild kick)
- 1/2 teaspoon kasuri methi (dried fenugreek), crushed (optional)
- Approx. 1/3 to 1/2 cup water, cold or room temperature, as needed
- Oil for deep frying (neutral oil like sunflower, canola, or peanut)
Instructions
- Mix the dry ingredients: In a large bowl, combine flour, semolina, salt, carom seeds, black pepper, and kasuri methi if using. Stir to distribute the spices evenly.
- Rub in the fat: Add 4 tablespoons of oil or ghee to the flour.
Use your fingertips to rub it into the flour until it resembles coarse breadcrumbs. This step is key—the mixture should clump when pressed and then fall apart. It’s what creates the flaky layers.
- Add water gradually: Sprinkle water a little at a time and bring the dough together. You’re aiming for a stiff, tight dough, not soft.
It should feel firmer than roti dough. Don’t over-knead; 1–2 minutes of gentle kneading is enough.
- Rest the dough: Cover the dough with a damp cloth and let it rest for 20–25 minutes. This relaxes the gluten and helps the mathri puff slightly and cook evenly.
- Shape the mathri: Divide the dough into small lemon-sized balls.
For classic shapes, flatten each ball into a disc about 2–2.5 inches wide and 1/4 inch thick. You can also roll the dough and cut rounds with a cookie cutter. Prick each disc 3–4 times with a fork to prevent puffing.
- Heat the oil: In a deep, wide pan, heat oil on medium-low.
To test, drop a tiny piece of dough—if it rises slowly with gentle bubbles, the oil is ready. If it sizzles hard and browns fast, it’s too hot.
- Fry low and slow: Slide in a few discs without crowding. Fry on low to medium-low heat, turning occasionally.
This slow fry ensures even cooking and a crisp, layered texture. Each batch should take 6–10 minutes, depending on thickness.
- Drain and cool: Once golden and crisp, remove the mathris to a wire rack or paper towels. Let them cool completely—they’ll firm up further as they cool.
- Taste and adjust: Try one after cooling.
If needed, sprinkle a pinch of salt while they’re still slightly warm, or note adjustments for your next batch.
Storage Instructions
- Cool the mathri fully before storing. Any trapped steam will make them soggy.
- Store in an airtight container at room temperature for up to 3 weeks.
- For longer storage, keep in a cool, dry place away from sunlight. Avoid the fridge—it can soften the texture.
- If they lose crispness, reheat in an oven at 300°F (150°C) for 5–7 minutes and cool again before serving.

Benefits of This Recipe
- Make-ahead friendly: Ideal for festivals, road trips, or busy workdays when you want a dependable snack.
- Customizable salt and spice: Adjust seasoning to suit kids or heat-lovers without changing the base recipe.
- Simple and vegetarian: Uses common pantry ingredients and needs no special equipment.
- Great with many pairings: Enjoy with chai, green chutney, mango pickle, or even a cheese board for a fun twist.
- Budget-conscious: A large batch costs little and feeds many.
Common Mistakes to Avoid
- Too little fat in the dough: Skimping on oil or ghee makes tough, hard mathri.
Keep the ratio right so it crumbles and flakes.
- Soft dough: A soft dough puffs up and gets chewy. Aim for a firm, tight dough that resists when pressed.
- High heat frying: Hot oil browns the outside and leaves the inside undercooked. Fry at a steady low to medium-low heat.
- Skipping pricks: If you don’t pierce the discs, they’ll balloon and turn bready instead of crisp.
- Crowding the pan: Too many pieces drop the oil temperature and cause greasy results.
- Storing while warm: Even mild warmth traps steam and kills the crunch.
Cool completely first.
Variations You Can Try
- Masala Mathri: Add 1/2 teaspoon red chili powder, 1/2 teaspoon cumin seeds, and 1/4 teaspoon turmeric to the dry mix.
- Whole Wheat Version: Swap half the maida with atta (whole wheat flour). Add an extra teaspoon of oil to keep it tender and expect a slightly denser bite.
- Bhujia-Style Crunch: Increase semolina to 3 tablespoons for a more rugged, extra-crispy finish.
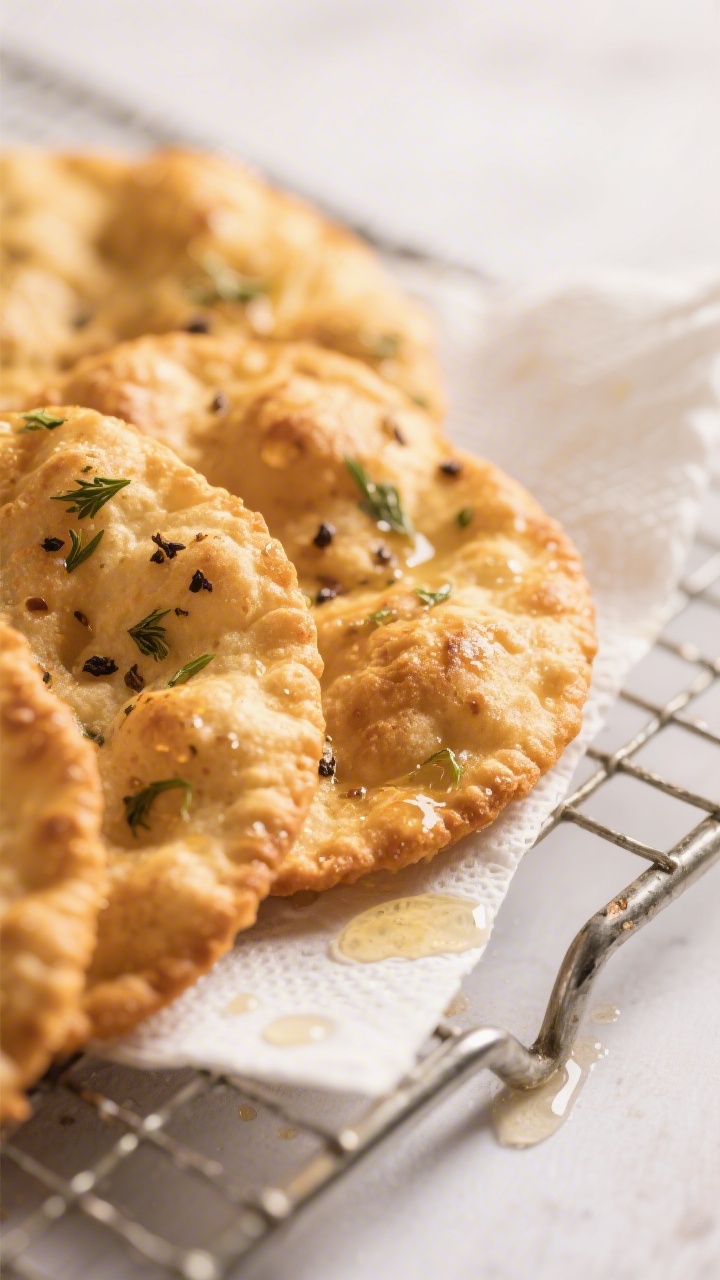
- Herb and Pepper: Use crushed black pepper and dried rosemary or thyme for a fusion appetizer that pairs well with cheese.
- Baked Mathri: Brush shaped discs with oil and bake at 350°F (175°C) for 15–20 minutes, flipping halfway. They won’t be as flaky as fried but still tasty and lighter.
- Stuffed Mathri: Add a tiny pinch of spiced besan (chickpea flour) filling between two thin discs, seal edges, prick, and fry slow.
FAQ
Why is my mathri not flaky?
Flakiness depends on enough fat rubbed into the flour and minimal water.
Make sure the flour clumps when pressed after adding oil or ghee. Keep the dough firm and avoid over-kneading, which tightens gluten and reduces layers.
Can I use only whole wheat flour?
Yes, but expect a denser, less flaky texture. Use 2–3 extra teaspoons of oil and rest the dough a bit longer to help tenderness.
Fry slightly longer on low heat for an even cook.
How do I keep mathri crisp for days?
Fry on a steady low to medium-low heat until fully cooked through, then cool completely. Store in an airtight container lined with a paper towel to absorb any residual oil.
Is baking a good substitute for frying?
Baking works for a lighter version, but it won’t match the flaky layers of frying. Brush with oil, bake at 350°F (175°C), and watch closely to prevent overbrowning.
Cool fully for best crunch.
What oil is best for frying?
Use a neutral, high-smoke-point oil like sunflower, canola, peanut, or rice bran oil. These keep the flavor clean and let the spices shine.
Can I make the dough in advance?
Yes. Wrap the dough and refrigerate for up to 24 hours.
Bring it to room temperature before shaping, and if it feels dry, knead in a teaspoon of oil.
Why do my mathris puff up?
The dough may be too soft, or you didn’t prick the discs. Also, oil might be too hot. Keep the dough firm, prick generously, and fry at a lower temperature.
What can I serve mathri with?
Classic pairings are masala chai, mango or lemon pickle, and green chutney.
For a modern twist, try a tangy yogurt dip or hummus.
Final Thoughts
Crispy mathri is simple, nostalgic, and endlessly snackable. With a firm dough, enough fat, and low, patient frying, you’ll get that perfect shatter and layered bite every time. Make a batch for the week, pack some for travel, or serve with chai when friends drop by.
It’s the kind of homestyle snack that never goes out of fashion—quietly comforting, deeply satisfying, and always welcome.
Printable Recipe Card
Want just the essential recipe details without scrolling through the article? Get our printable recipe card with just the ingredients and instructions.